Printable paper
Cursive Lined Paper: Free Printable Handwriting Sheets
Good practice paper is half the battle in cursive. If the lines are too close, your letters get cramped; too far apart and you lose the sense of height. This page offers eight free printable PDFs: three line heights, an extra version with slant guides, and every one in US Letter and A4. Below the downloads you will find how to choose the right size, how to print so the lines stay accurate, and how to use slant guide lines properly.
By Salah eddine · Last updated October 29, 2026 · Editorial policy
Download the paper (8 free PDFs)
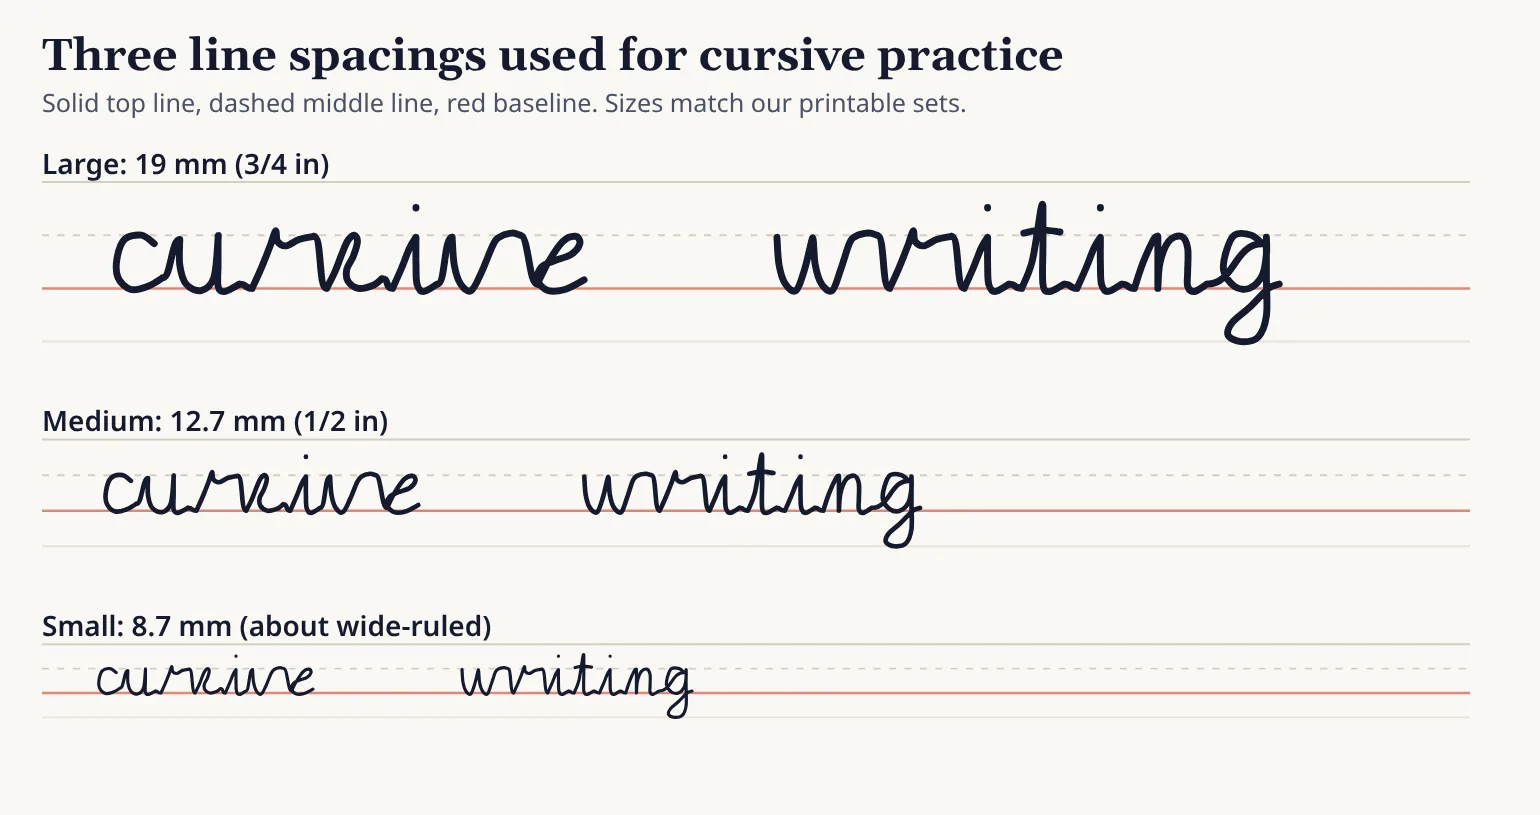
Every sheet has the same structure: a solid top line, a dashed middle line and a red baseline, with a gap before the next set so that descenders from letters such as g, j, p, q and y have room. A name and date line sits at the top. Each file is one page and works on any printer.
| Style | Line height | Sets per page (Letter / A4) | Download |
|---|---|---|---|
| Large | 19 mm (3/4 in) | 7 / 8 | Letter PDF · A4 PDF |
| Medium | 12.7 mm (1/2 in) | 11 / 12 | Letter PDF · A4 PDF |
| Small | 8.7 mm (about wide-ruled) | 17 / 18 | Letter PDF · A4 PDF |
| Medium with slant guides | 12.7 mm (1/2 in) | 11 / 12 | Letter PDF · A4 PDF |
The line height is the distance between the top line and the baseline, which is the space the tall letters use. The pictures below show what each size looks like with real cursive written on it.
How to choose the right line size
There is no single correct size, and school programs differ. These are practical rules of thumb.
- Large (19 mm) suits young children learning the first shapes, adults relearning cursive slowly and anyone who wants big, free movements. Large writing is easier to control because every curve has room.
- Medium (12.7 mm) is a good default for most learners from about second or third grade, and for adults. It is the size where you can practice joins and words without running out of space.
- Small (8.7 mm) is close to standard wide-ruled notebook paper. Use it once your letters are consistent and you want to write at a normal size.
- Slant guides help when you can write the letters but your slant wanders from word to word.
A sensible path is to start at large for a week of shapes, drop to medium for words, and move to small when your height is consistent. If you are teaching a child, follow the line size the school uses, because the teacher's models are drawn for it. Our teach kids cursive guide has a suggested order.
How to print so the lines are accurate
- Open the PDF and choose Print.
- Select the paper size that matches the file (Letter or A4). If you choose the wrong one, the page may shrink or be cut off at the edges.
- Set scaling to 100%, actual size, or none. Do not choose "fit to page" or "shrink oversized pages".
- Print one page first and measure the large set with a ruler: from the top line to the red baseline should be 19 mm for the large sheet, 12.7 mm for medium and 8.7 mm for small.
- For heavy practice, print on slightly thicker paper (80 gsm or more) so the pen does not show through.
The sheets are drawn to the exact sizes above, but home printers differ by a small fraction of a millimetre depending on their margins. That does not affect practice.
Using slant guide lines
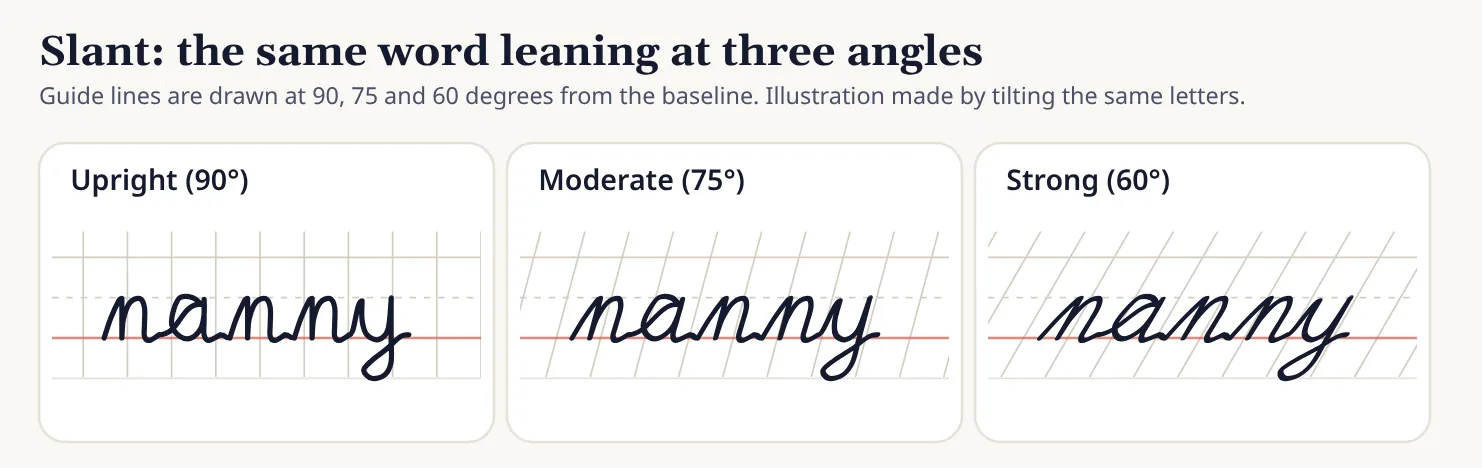
Slant is the lean of your letters. The most common problem in cursive is not the shape of the letters but a slant that changes: a word leaning right, then upright, then back. Guide lines give your eye a reference. On the slant sheet, the diagonal lines are drawn at 60 degrees from the baseline. That is a moderate lean. Programs use different slants, many roughly in the range of 50 to 60 degrees from the baseline, and some modern styles are almost upright. What matters is that you choose one and keep it.
- Place the long downstrokes of letters such as l, t, d, h, p along the guide lines.
- Use the guides for the first few lines, then try a line without looking at them.
- If left-handed, a more upright slant is often more comfortable. See left-handed cursive.
To learn what each letter should look like before you practice on the paper, use the cursive alphabet and the stroke-by-stroke guides.
What to write on the paper
Blank lines can be intimidating. Here is a structure for a 20-minute session.
- Warm-up (3 min): one line of rolling ovals, one line of upward loops and one line of downward loops.
- Letter group (6 min): write one family of letters across a line, such as a, c, d, g, q (they all start with the same oval).
- Joins (6 min): a line each of in, an, or, ow, th and ell. See cursive joins.
- A sentence (5 min): one sentence, slowly, with a space between each word about the width of a letter o. See the practice sentences.
For dedicated tracing pages, see the worksheets collection and the worksheet generator, which builds a custom sheet from your own text. This page is for blank paper, so you can write whatever you like.
Common problems on lined paper, and fixes
| Problem | Likely cause | Try this |
|---|---|---|
| Letters touch the line above | Line height too small for your current size | Move up one size, or write smaller and slower |
| Letters float above the baseline | Pen is lifted too early at the end of the stroke | Finish each letter on the red line before the connector |
| Tall letters are all different heights | No sense of the top line | Use the large sheet and aim for the solid top line on every l, t, d and h |
| Words lean differently | Slant not controlled | Use the slant sheet for a week, then switch back |
The red baseline is the most useful line: if the bottoms of your letters touch it consistently, spacing and height usually fall into place. If a letter fills the entire space from top line to baseline, it is probably a tall letter, and small letters should reach the dashed middle line only.
Other uses for lined handwriting paper
The same sheets work for calligraphy practice, for children writing their names, for lettering ideas before a tattoo design and for practicing a signature. If you need lines of a different height, our worksheet generator lets you set size and content, and you can save as a PDF from your browser.
Frequently asked questions
What size should cursive lined paper be?
A common choice is 12.7 mm (half an inch) between the top line and the baseline, which suits most learners. Use 19 mm for beginners and young children, and 8.7 mm once your writing is consistent and you want to write at a normal size.
What are the three lines for?
The solid top line marks the height of capital letters and tall letters like l, t, d and h. The dashed middle line marks the height of small letters such as a, c, e, m and n. The red baseline is where every letter sits.
Should I print on Letter or A4 paper?
Use Letter for the US and Canada and A4 for most other countries. Both sets contain the same line heights, but the A4 pages fit one extra set of lines.
Why are the printed lines the wrong size?
Almost always the printer is set to "fit to page" or "shrink to fit". Choose actual size or 100 percent and the line heights will match what is listed on this page.
How much slant should I use in cursive?
It varies by school and style. Many programs use a moderate lean, and some are almost upright. Pick one that feels comfortable and keep it consistent. The slant sheet has guide lines at 60 degrees from the baseline.
Can I use these sheets in a classroom?
Yes. The PDFs are free for home and classroom use. Please do not resell them.
Is there lined paper with the letters printed for tracing?
Yes. The worksheets collection and the worksheet generator have tracing sheets for letters, words, numbers and sentences. The paper here is blank on purpose.
Keep going
Printable worksheets
Tracing sheets for letters, numbers and words.
Worksheet generator
Make a custom tracing sheet from your own text.
Cursive alphabet
Learn each letter before you practice it.
Practice sentences
Pangrams and sentences for each letter group.
How we write and check pages: editorial policy.