Joins and connections
Cursive Joins: How to Connect Letters
A join is the short stroke that carries the pen from the end of one letter into the start of the next. Most beginners learn the 26 shapes first and then discover that words still look broken, because the real skill is the joins. This guide shows the few rules that cover almost every connection, where each lowercase letter exits, the ten pairs that go wrong most often, and a plan for practicing them.
By Salah eddine · Last updated October 29, 2026 · Editorial policy
What a join actually is
Take any cursive word and slow it down. Between the letters there is a small connector, usually an upward flick, that is part of the preceding letter. In print you lift the pen after every letter. In cursive you keep the pen on the paper, and each letter ends by pointing the pen at the place where the next letter begins. That ending is called the exit stroke, and the beginning of the next letter is its entry.
The practical consequence is that a letter is never written in isolation. The same lowercase e begins slightly differently after an n than after a w, because the pen arrives at a different height. Once you see joins as "exit height meets entry point", most of the confusing cases become predictable.
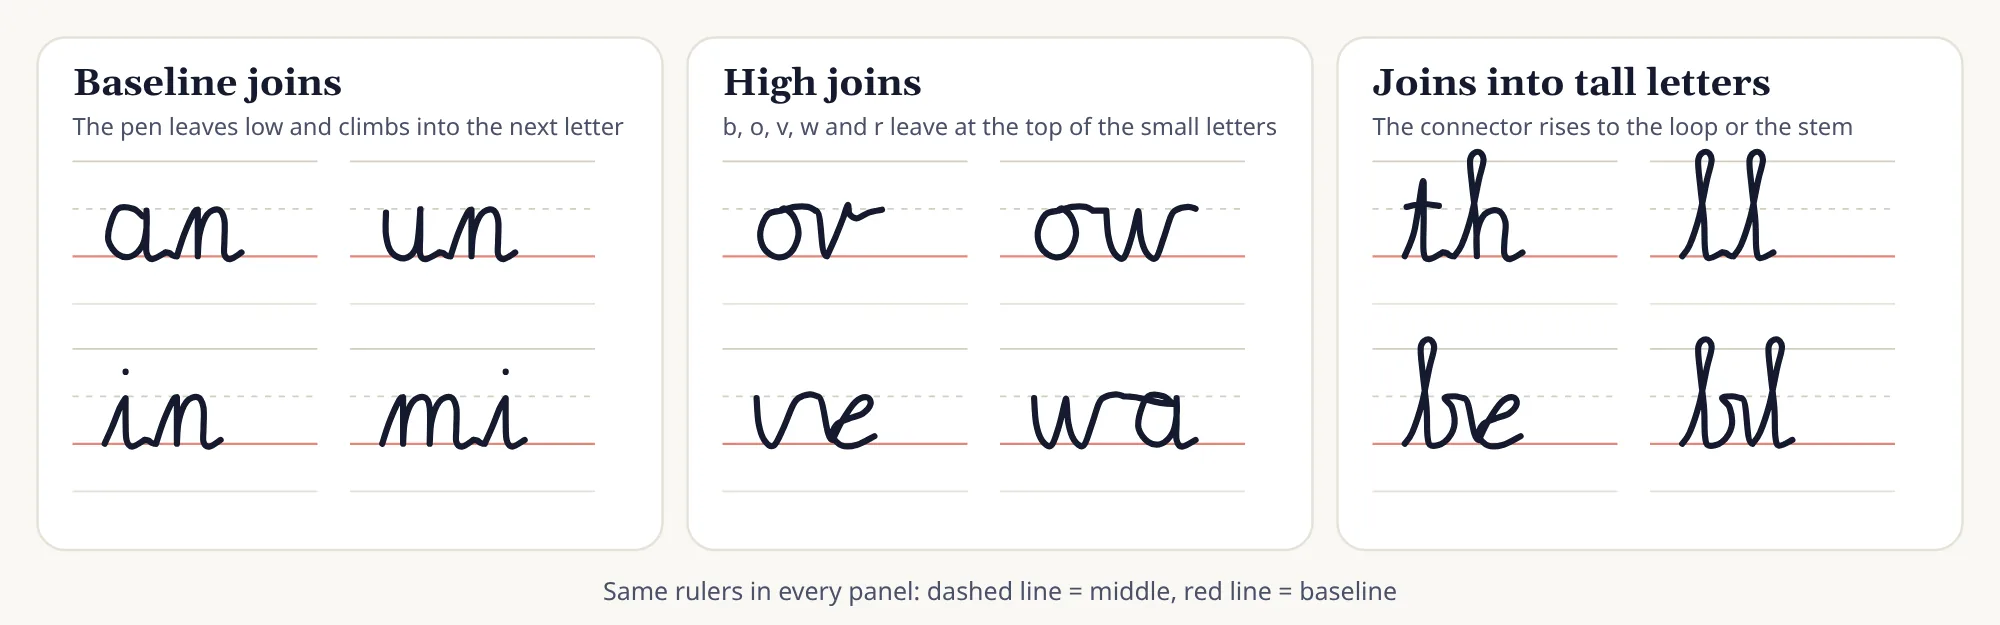
The figure above shows the three families you will meet in nearly every word: baseline joins, high joins and joins into tall letters. The sections below take them in turn. If you are still shaky on the individual shapes, work through the cursive lowercase letters first, then return here; the full lesson sequence is on the learn cursive page.
Where each letter hands the pen on
There are only two exit heights in everyday cursive. Most lowercase letters leave at the baseline: the pen finishes at the bottom of the letter and sweeps up in a small curve. Four letters, b, o, v and w, plus the shoulder of r, leave at the top of the small letters, level with the dashed middle line, and travel across to the next letter. In the chart below, red arrows mark baseline exits and blue arrows mark high exits.
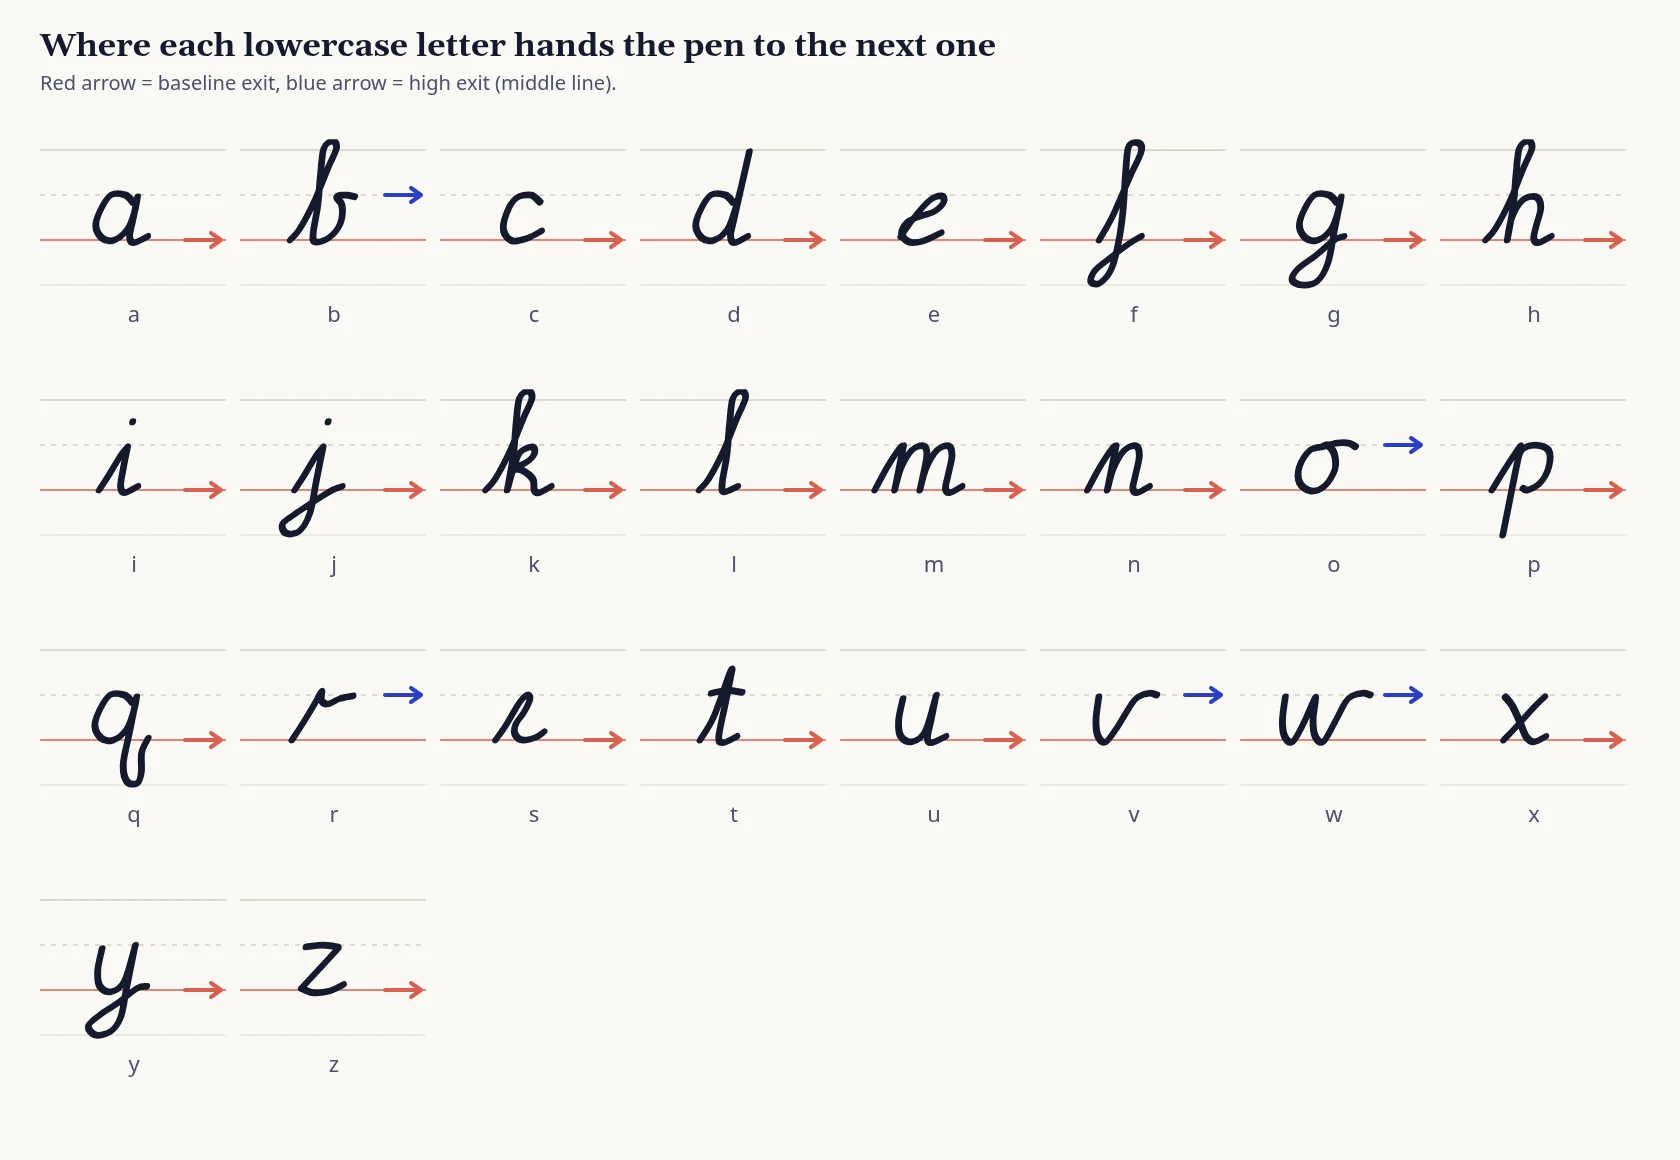
Letters with descenders, f, g, j, p, q and y, still finish at the baseline in this model, even though part of the letter hangs below it. The pen goes down, loops or turns, and climbs back up through the baseline before it exits. That is why the tails of g, j and y are drawn with a rising stroke rather than a flat one.
Programs differ on a few of these details. Some school models finish s or r with a slightly different flick, and capital letters follow their own rules (see the capital letters page). If your teacher has given you a model sheet, treat it as the final word and use this page to understand the logic.
Baseline joins: the easy majority
A baseline join is the default. The previous letter ends at the bottom, the pen rises along a slanted line, and the next letter starts partway up. Words built entirely from baseline joins, such as minimum, union, animal and mint, are the best place to start because the movement is the same every time: down, bottom curve, up.
- Keep the connector short. Roughly the width of one downstroke. A long connector makes spacing uneven and the word sprawls.
- Keep the slant constant. Every upstroke should be parallel. If one connector is steeper, the word looks like it has been typed by two people.
- Never retrace. The upstroke that finishes a letter is the same stroke that starts the next. Going back over it makes a blob and slows you down.
Try the words in, an, un, mi, ni, mum, nun, imitation and minimum across a full line. If you get the rhythm of the exit flick and the entry upstroke here, joins into letters like a, c, d, g and q become much easier, because those round letters simply start with a short upswing from where the connector arrives.
High joins: o, v, w, b and r
A high join leaves the letter at the middle line and travels across horizontally, then drops or curves into the next letter. It is the single biggest difference between joins that look natural and joins that look forced, and it is why words such as ovation, window, brown and very feel different under the pen.
- Finish the o (or v, w, b) at the middle line, with the pen moving to the right and slightly upward.
- Carry the pen across without letting it fall to the baseline. The connector is a nearly flat bridge about one letter-width long, rather than a steep climb.
- Start the next letter from the end of the bridge. Letters that begin with a downward curve, such as n, m, r, s and e, take the bridge naturally. Round letters such as a, d and g need you to travel back to the right-hand side first (see the tricky pairs below).
Practice high joins in short words first: or, ow, ve, we, wa, br, bu. The pair ow is the best single drill, since it contains a high exit and a high exit again, and it exposes whether your bridge is level.
Joins into tall letters and loops
Letters with ascenders, b, d, f, h, k, l and t, start with the pen travelling up to the top line. The connector arriving from the previous letter does not stop at the baseline: it keeps rising in the same direction until it reaches the top of the loop or the stem. In th, ll, bl and ch the connector and the upstroke of the tall letter are one continuous line.
This is where slant discipline matters most, because a tall letter exaggerates any lean. Keep the loop narrow: the up and down strokes of an l should be close enough together that a pencil tip would just fit between them. A wide loop collides with letters on the line above and reads as a different letter.
Two letters are special. The t is crossed after the word is finished, and its stem is shorter than an l, so the two do not look alike. The f is the longest letter in the alphabet, with a loop above and a loop below the baseline, so give it room and bring the pen back to the baseline before the next letter begins.
The ten pairs that cause most broken joins
These ten combinations account for most of the "something is wrong with this word" moments. Study them together, then practice each ten times in a row.
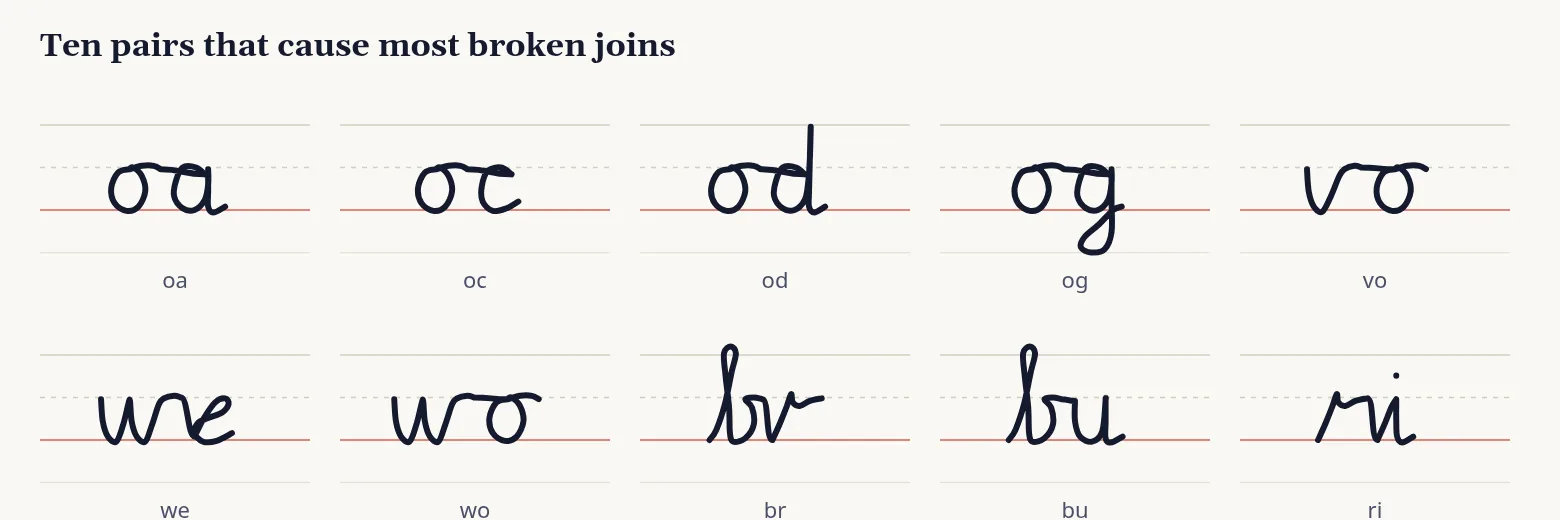
| Pair | What goes wrong | Fix |
|---|---|---|
| oa | The bridge from the o collides with the entry of the a, and the a closes badly. | Let the bridge run past the a, then curl back counter-clockwise to start the oval from its right side. |
| oc | The c becomes a flat hook. | Same approach as oa: carry the bridge across, then draw the c as a smaller open curve. |
| od | The d loses its ascender. | After the oval, the pen goes straight up the stem before returning down; do not shortcut the stem. |
| og | The g tail swings left of the oval. | Finish the oval first, then drop the tail straight down and back up through the baseline. |
| vo | The v and o merge into one blob. | Lift your attention, not your pen: complete the v at the middle line, pause the rhythm, then start the o at the top. |
| we | The e collapses into a hook. | Keep the bridge flat, then start the e with a short diagonal up and into its loop. |
| wo | The bridge dips and the o starts too low. | Hold the middle line until the very end of the bridge. |
| br | The b and r share one stroke and look like a letter k. | End the b at the middle line, then lift the shoulder of the r clearly above the baseline. |
| bu | The bridge is too steep. | Keep it level; the u starts at the middle line, not the baseline. |
| ri | The i loses its dot or looks like a v. | Complete the word first, then add the dot above the stem. |
When you may lift the pen
Cursive is not "never lift the pen". It is "lift the pen only where the letter requires it". Four places are standard:
- Dots and crosses. The i and j dots, and the crossbars of t and x, are added after the word is finished, so the main stroke stays continuous. Going back mid-word breaks the rhythm.
- Between words. Lift, move about the width of one o to the right, and start the next word. A gap that is too narrow makes two words look like one; one that is too wide makes the line look sparse.
- After some capitals. Several schools teach capitals as separate shapes that do not connect to the next lowercase letter, while others join them. Follow your model.
- At the end of a long word. If your hand is cramped, lifting after a syllable is far better than distorting the next letters. Neatness beats purity.
A seven-day plan for better joins
- Day 1: baseline joins. Fill a line each of in, an, un, mi, nun, minimum. Slow, steady slant.
- Day 2: high joins. Fill a line each of or, ow, ve, we, wa, window, ovation.
- Day 3: tall letters. th, ll, bl, ch, hill, tall, stable.
- Day 4: round letters after joins. ma, na, ra, ca, da, ga. Watch that every a closes.
- Day 5: tricky pairs. The ten pairs above, ten times each, then in words such as boat, brown, wood, very and obey.
- Day 6: whole words. Copy the example words from the cursive words collection at a relaxed speed.
- Day 7: a short passage. Write four lines of a poem or a paragraph from a book, then compare it with Day 1.
Short, frequent sessions work better than one long one. Ten focused minutes a day is enough; stop when your slant starts to drift, because tired practice teaches the wrong movement.
Diagnosing joins that look wrong
| What you see | Likely cause | What to try |
|---|---|---|
| Letters float apart with gaps | Pen is lifting early or the exit stroke is too short | Finish every letter with the upward flick before starting the next one |
| The word leans more and more | Paper angle or wrist position has drifted | Re-angle the paper and re-draw a slant guide line at the start of each line |
| Tall letters look like each other | Loops too wide or inconsistent heights | Rule a top line and keep every ascender to it |
| Round letters will not close | Entry from a high join is too low | Carry the bridge past the letter, then curl back to start the oval |
| Everything looks cramped | Connectors too short or letters too wide | Narrow the letters first, then lengthen the connectors a touch |
Most of these problems appear together, so fix them in this order: slant, then height, then spacing, then speed. Our guide to common cursive mistakes goes into the habits behind each one, and what pen you use changes how forgiving joins feel.
Frequently asked questions
How do you connect letters in cursive?
End each letter with a small upward exit stroke and start the next letter from where that stroke finishes. Most letters exit at the baseline; b, o, v and w exit at the middle line and need a level bridge.
Which cursive letters join at the top?
The letters b, o, v and w leave from the top of the small letters, and so does the shoulder of r. After them the pen travels across to the next letter rather than climbing from the baseline.
Do all cursive letters connect?
Lowercase letters connect inside a word. Capital letters are handled differently by different school models: some connect to the next letter, others stand alone. Follow the model your teacher uses.
Why do my cursive letters look disconnected?
Usually the exit strokes are too short, the pen lifts mid-letter, or the slant changes from letter to letter. Slow down and finish each exit before you begin the next letter.
Is it okay to lift my pen while writing cursive?
Yes, where the letters need it: dots, crossbars, the gaps between words, and the end of a long word if your hand tires. Lifting for a single stroke is better than distorting the shape.
How do you connect o to a in cursive?
Let the bridge from the o run past the start of the a, then curl back counter-clockwise to draw the oval from its right-hand side. Practice oa, oc, od and og together because they all need the same move.
How long does it take to learn cursive joins?
Many learners join most letters smoothly after two to three weeks of ten-minute sessions. Fast, consistent joining across whole lines usually takes a few months of regular writing.
Keep going
Learn cursive step by step
The full beginner path, from basic strokes to connected words.
Cursive lowercase letters
Stroke order and tracing for all 26 lowercase letters.
Common cursive mistakes
Slant, spacing and loop problems, and how to fix them.
Free cursive worksheets
Printable tracing sheets, including a connecting letters sheet.
How we write and check pages: editorial policy.